


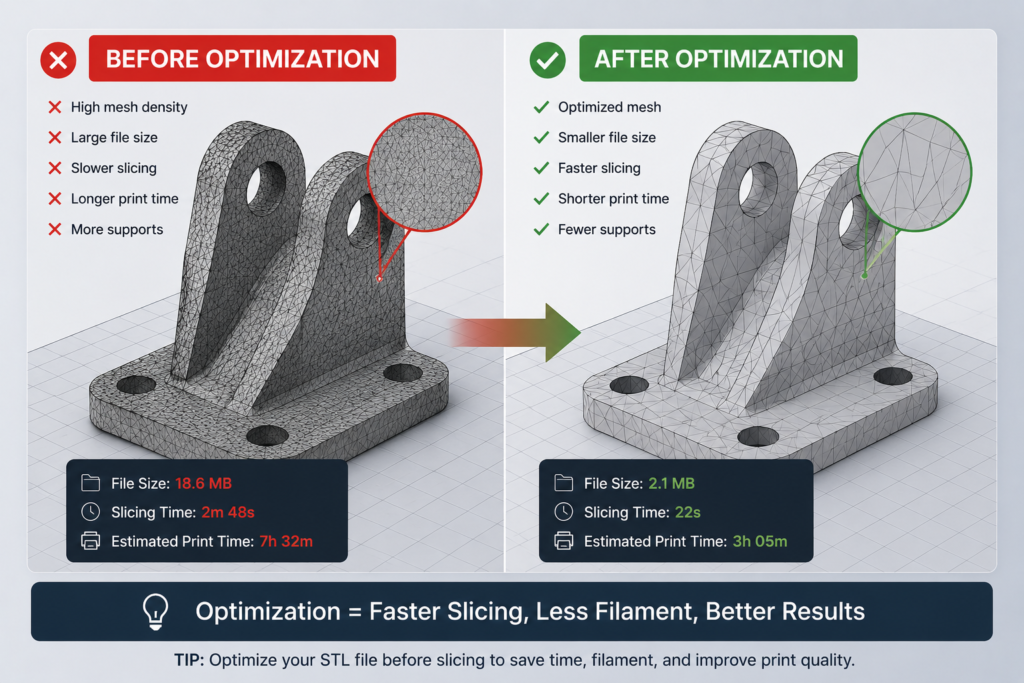
A large or poorly prepared STL file can slow down more than just your upload. It can make slicing slower, create unnecessary support material, increase print time, and lead to inefficient prints that use more filament than needed.
In this guide, we explain how to optimize STL files for faster printing without ruining the model. You will learn what actually affects print speed, how to reduce unnecessary complexity, and what to check before sending a model to print. If you need help preparing a file for production, you can use our 3D printing service UK or upload your model directly through our instant quote / upload page.
Optimizing an STL file means preparing the model so it prints more efficiently while still keeping the shape, strength, and important details you need.
This can involve:
The goal is not just to make the file smaller. The goal is to make the print process smoother, faster, and more practical.
A badly prepared STL file can slow down printing in several ways.
It may:
A well-optimized STL file can help produce:
That is why STL optimization is not just a computer-side cleanup task. It directly affects the real printing workflow.
Before optimizing an STL file, it helps to understand what really increases print time.
Some STL files contain more surface detail than the printer can realistically reproduce. This creates heavier files and more complex toolpaths without improving the final part in a meaningful way.
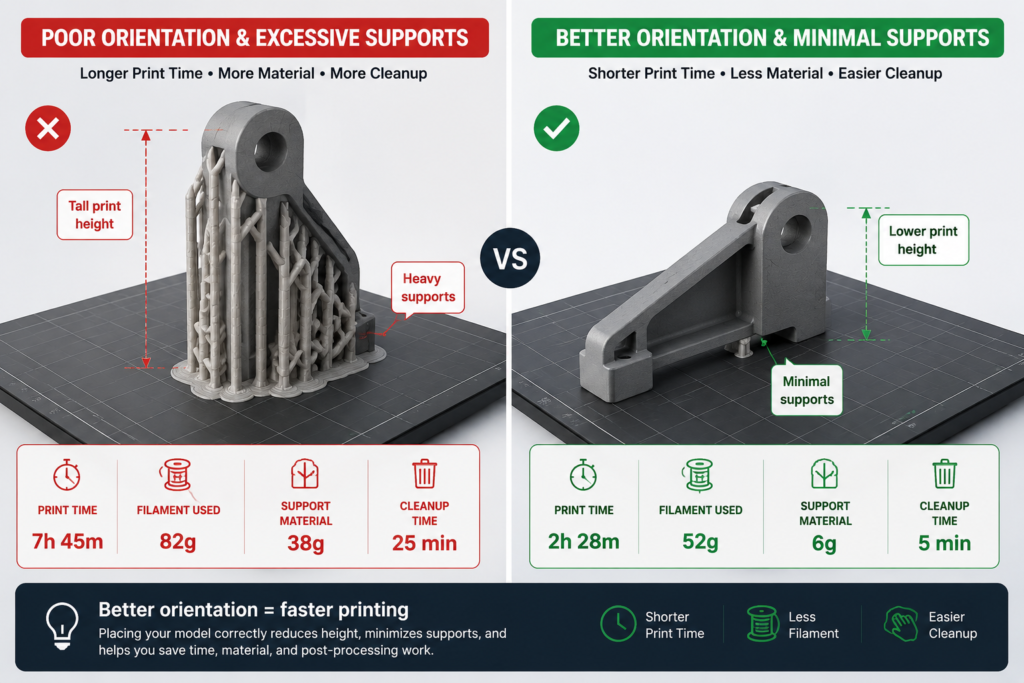
A model that is badly oriented may require:
Changing orientation alone can sometimes reduce print time significantly.
Supports increase print time, use more material, and add cleanup work after printing. If a model is designed or placed poorly, the printer may spend a large part of the job building supports instead of the actual part.
Some parts include decorative or internal geometry that adds print time but does not improve function. In other cases, the model may simply be scaled larger than necessary.
Damaged STL files can cause strange slicing behaviour, inefficient paths, or repair attempts that complicate the print.
You may also want to read Why STL Files Fail in 3D Printing.
There are several practical ways to make an STL file more efficient before printing.
One of the easiest ways to optimize an STL is to reduce excessive mesh density while keeping the model visually accurate.
Very dense meshes can:
In many cases, a moderately simplified mesh prints just as well as a very dense one.
You may also want to read How to Reduce STL File Size and What Resolution Should STL Files Be.
Orientation has a huge impact on print speed.
A better orientation can:
For example, lowering the overall height of the part often reduces total print time more effectively than obsessing over tiny mesh changes.
Some STL files include details that are too small to matter in the final print, especially on FDM machines.
These may include:
Removing these details can make the file lighter and the print faster, especially if they generate extra toolpaths or tiny movements.
A damaged STL may slice inefficiently or unpredictably. Before printing, check for issues such as:
A cleaner file often slices more efficiently and reduces the chance of wasted print time.
You may also want to read How to Repair Broken STL Files.
A model that is larger than necessary will always take longer to print. Sometimes the simplest way to reduce print time is to make sure the part is not oversized.
Check whether:
You may also want to read (How to Scale STL Files Correctly).
Walls that are too thin can fail, but walls that are unnecessarily thick can also increase print time and material use.
The key is to use sensible wall thickness for the part’s purpose.
For functional parts, wall strength matters. For draft models or visual prototypes, lighter wall design may be enough and much faster to print.
A better STL file does not just help the printer. It also helps the slicer.
An optimized file can lead to:
This makes the whole workflow more efficient, especially when handling multiple files or larger jobs.
These two ideas are related, but they are not exactly the same.
This focuses on making the file lighter to:
This focuses on improving the print workflow itself by looking at:
A smaller STL file can help, but faster printing often depends just as much on how the model is prepared and placed.
Optimization is useful, but it is also easy to overdo.
Avoid these mistakes:
The goal is not to destroy detail. The goal is to remove waste.
STL optimization is especially useful for:
It is often less important on:
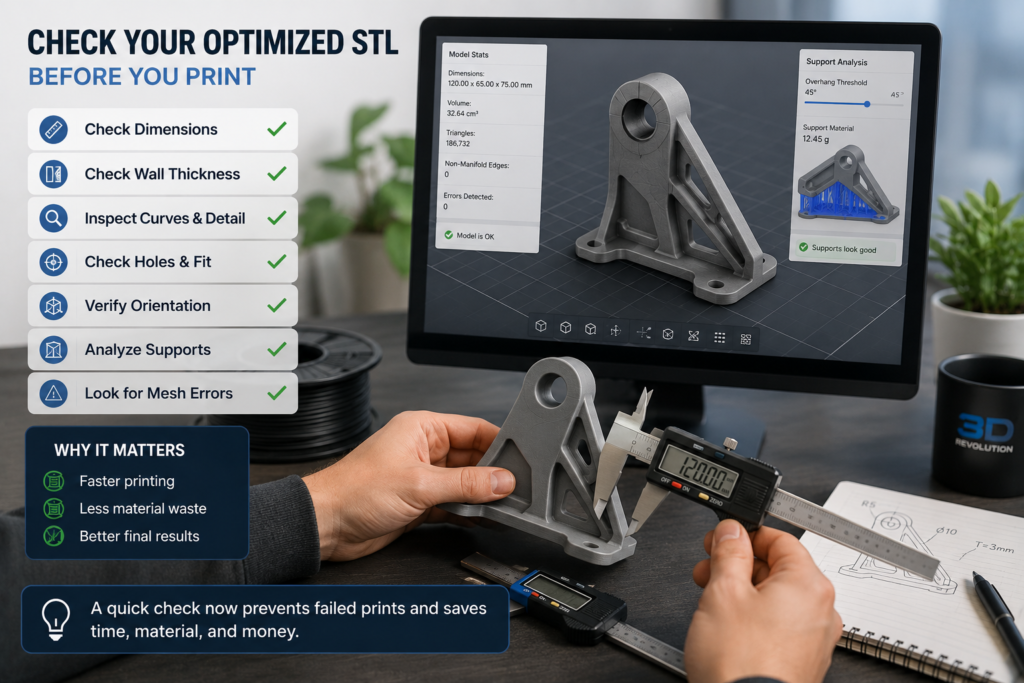
After optimizing the file, always inspect it again before printing.
Check:
A faster print is only helpful if the part still works and looks correct.
You may also want to read How to Check If a Model Is 3D Printable.
Not always.
Sometimes optimization gives a clear time reduction. Other times, the difference is smaller. It depends on the model and the print settings.
You are more likely to see bigger improvements when:
For already simple models, the gains may be more about cleaner workflow than dramatic time savings.
If your STL file:
then it is worth having it checked before production.
At 3DRevolution, we help customers review STL files, simplify unnecessary complexity, and prepare models for efficient production in the UK. You can upload your file through our instant quote / upload page or learn more about our 3D printing service UK.
Optimizing an STL file for faster printing is about more than just reducing file size. It means preparing the model so it slices cleanly, prints efficiently, and avoids unnecessary time, supports, and material use.
For most 3D printing jobs, the best approach is to simplify excess mesh detail, choose a better orientation, remove unnecessary complexity, and review the model carefully before printing. A well-optimized STL makes the whole workflow faster and more reliable.